What is the Figma plug-in used for?
Designs created in Figma are often the starting point for websites, apps, and interfaces that need to be available in several languages. The Figma plug-in developed by Ian Barrow (Conversis) makes the texts of a Figma design available for translation in translate5 and writes the translations back into the design afterwards. This saves the tedious copy-pasting between design tool and translation file and prevents the errors that typically come with manual text transfer.
The plug-in exports all texts of a design into an XML file, including inline elements that mark changes in formatting, colour and font. This XML file is imported into translate5 as a work file. In combination with image exports of the design as Visual files, translators and reviewers see the texts directly in their layout context while they work, which is particularly valuable for interface texts, where the space available is limited.
Main functions of the Figma plug-in
Complete text export: All texts contained in the design are exported into a structured XML file.
Preservation of formatting: Changes in formatting, colour and font within a text are exported as inline elements and are protected in translate5 as internal tags.
In-context translation: In combination with image exports of the design as Visual files, the translation takes place directly in the Visual view.
Round trip back into the design: The translated XML file is imported back into a copy of the Figma design, where the plug-in replaces the source texts with the translations.
Advantages for the translation process
Fewer sources of error: Texts are neither copied by hand nor reassembled, so nothing is forgotten or placed in the wrong element.
Better assessment of the layout: Translators see straight away whether their translation fits into the element provided, which considerably reduces the number of correction loops with the design team.
Reusability: As the translation takes place in translate5, all texts end up in the Translation memory and are available for the next version of the design.
Requirements
 | In order to be able to use the functions described here, the Visual plug-in needs to be installed. |
|---|---|
 | The Figma plug-in runs in Figma, not in translate5. You will find it in the Figma community under Conversis Translation XML Text Export & Import. It is free of charge. |
| You need edit rights for the Figma file that is to be translated. |
| The Figma file must not contain any missing font warnings. If fonts are missing, the plug-in cannot write the translation back into the design. |
 | If you use image exports of the design as Visual files, the requirements for character recognition apply: a valid Google Cloud Vision API key must be stored in the system configuration under runtimeOptions.plugins.VisualReview.googleCloudApiKey, and the PHP extension “Imagick” must be installed and functional on the server. |
Exporting the texts from Figma
- Duplicate the Figma file that is to be translated and continue working in the duplicate. The plug-in writes the translation into the file it was started from, so the original design remains untouched.
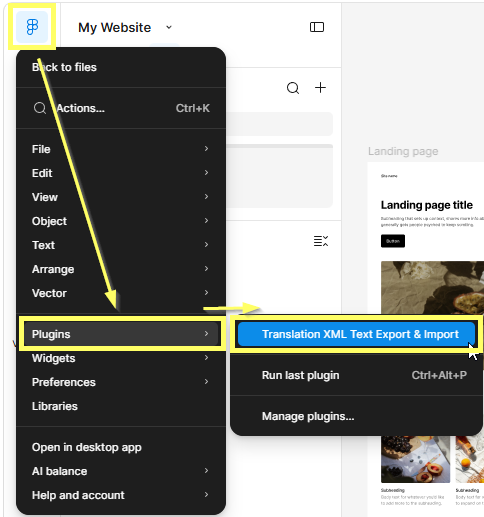
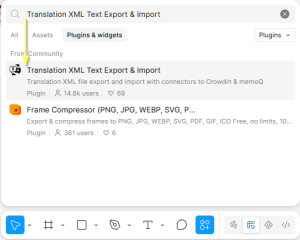
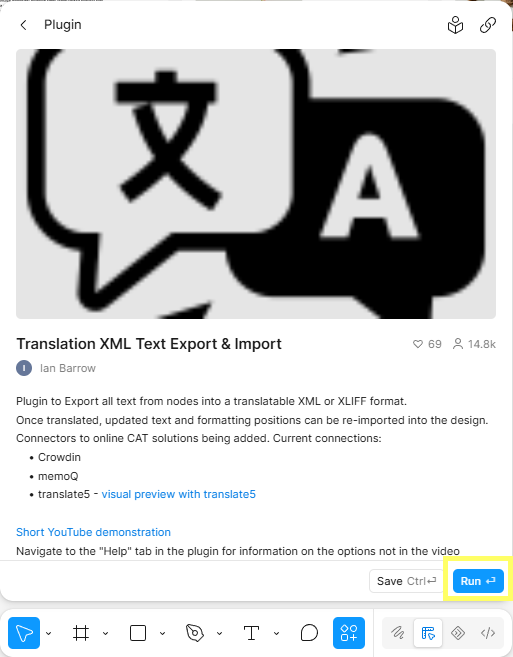
- In the duplicate, open the menu “Plugins” and select “Translation XML Text Export & Import”.
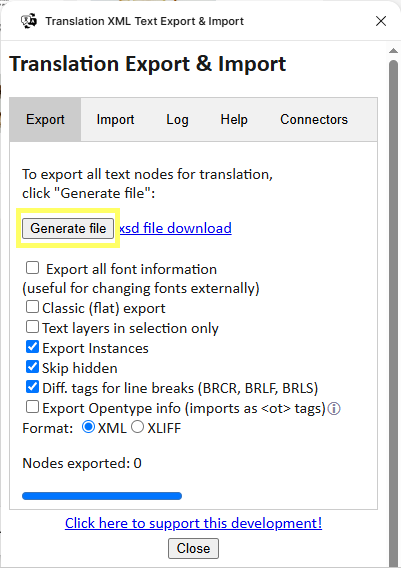
- Switch to the export tab and select the export format “XML”.
- Export the file and save it locally.
| The plug-in also offers an XLIFF export. We recommend the XML format, as the XLIFF variant is not compatible with every system. |
|---|---|
| Create one duplicate per target language. The import at the end of the process replaces the texts in the file, so a separate design file is needed for each language. |
| Export setting “Diff. tags for line breaks”: Manual line breaks in headlines survive the round trip as the correct break type. Cost: more internal tags in the segments. If your designs have few manual breaks, off is quieter. |
| Export setting “Text layers in selection only”: The decision whether to switch this on or leave it on off that matters is that the text scope and the Visual scope match. If you export PNGs of selected frames, export the text from that same selection, otherwise you get segments with no image to match against. For a whole-file job, leave it off and export the whole design as Visual too. |

Exporting the design to be used as a Visual file
In order for the texts to be displayed in their layout context in translate5, the design is additionally exported as an image or as a PDF and uploaded as a Visual file.
- In Figma, select the frames whose texts you have exported.
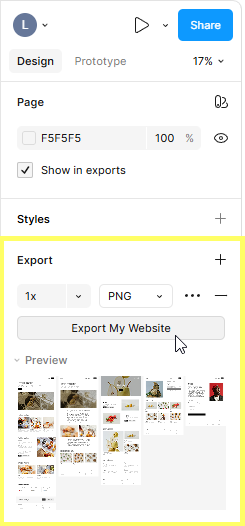
- Export the selection as PNG.
- Save the export next to the XML file.
| The following graphic file formats are permitted for Visual files: JPG, JPEG, GIF, PNG, BMP, TIFF, WEBP. |
|---|---|
| Pixel-based images are the more robust choice for Figma designs, as the frames of a design usually differ in size and orientation. If you would rather work with a PDF, please note that all pages within a PDF file – and especially across several PDF files – must have the same format and orientation. |
| So that translate5 Visual displays the texts in the correct font after character recognition, create the project on the basis of an import ZIP that includes the corresponding web font in WOFF format. |
Creating the translation project in translate5
The project is created in the same way as any other project, see Projects and project creation.
- Upload the XML file exported from Figma as a work file.
- Upload the image export of the design as a Visual file.
- Select the source language and the target language(s) and create the project.
During the import, translate5 analyses the Visual files, performs character recognition and assigns the texts found in the images to the strings in the XML file. The result in the translate5 editor is a live preview of the texts on the basis of the design provided.
| Alternatively, you can upload the XML file and the image files together in an import ZIP. The XML file belongs in the “workfiles” folder, the images in the “visual” folder. |
|---|---|
| Only the texts contained in the XML file appear in the segment table. Any additional text contained in the images is ignored. |
| Visual files can also be added or exchanged later if the design changes while the project is running. |
TODO verify: whether a dedicated file format setting or import template is required in translate5 for the XML produced by this plug-in, in particular so that the “base” element is not offered for translation.
Translating the design
Open the task in the translate5 editor and translate or review the segments as usual. The Visual view shows the design alongside the segment table, so you can see at a glance where each text sits in the layout. Clicking on a text passage in the Visual takes you directly to the corresponding segment.
| Please leave the internal tags in the segments untouched. They carry the changes in formatting, colour and font that came from Figma and are needed in order to write the texts back correctly. |
|---|---|
| Multiple consecutive spaces are meaningful in Figma designs, as they are sometimes used to position texts. Reproduce the spacing of the source exactly. |
| Keep an eye on the length of the translation. Text that turns out considerably longer than the source will not fit into the design without manual adjustments afterwards. |
| The Visual is a preview that helps you assess the context and the space available. It is not a rendering of the final design. |
Importing the translation back into Figma
- Export the translated file from the task list. You will receive the XML file back, now containing the translations.
- Open the Figma duplicate intended for this target language.
- Open the “Plugins” menu and select “Conversis Translation XML Text Export & Import”.
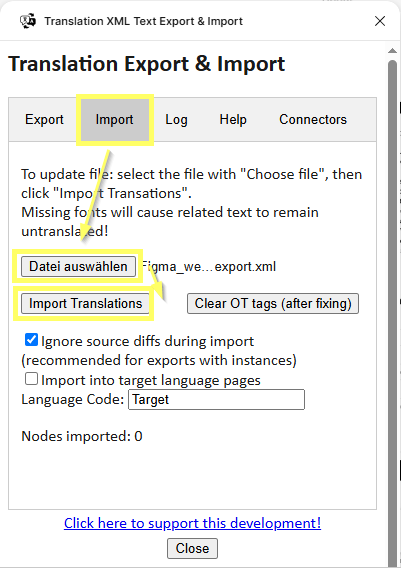
- Switch to the import tab, click “Choose file” and select the translated XML file.
- Start the import. The plug-in replaces the texts in the design with the translations.
- Check the result and adjust the layout wherever the translated text no longer fits.
| Attention: The “base” element in the XML file must not be translated or otherwise changed. The plug-in uses it to check whether the design still matches the file that was exported. If it has been changed, the import fails or produces incorrect results. |
|---|---|
| The import overwrites the texts in the file it is started from. Always work in a duplicate, never in the original design. |
Limitations
The limitations listed below might depend on the Figma version you use.
| Limitation | Effect |
|---|---|
| Bullet points | Bullet points are lost during the import back into Figma, as they are not supported by the Figma plug-in interface. |
| Right-to-left languages | Languages such as Arabic and Hebrew are currently not adequately supported by Figma. This workflow is therefore not suitable for these languages. |
| Missing fonts | A design containing missing font warnings cannot be written to by the plug-in. Resolve the font warnings before the import. |
| Text expansion | Longer translations are written into the design, but the layout is not adjusted automatically. Manual reworking in Figma remains necessary. |