| In order to be able to use the functions described here, the Visual plug-in needs to be installed. |
|---|
Exchanging a Visual file
In the event that the layout template of a file to be translated has changed in a running project with Visual integration, you can replace the corresponding file for the Visual as follows:
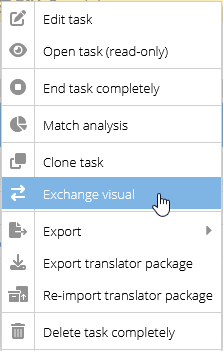
- Switch to the task list.
- Open the task menu on the line of the relevant project (
 ) and select the “Exchange Visual” option.
 - The “Visual file upload and configuration” window appears.
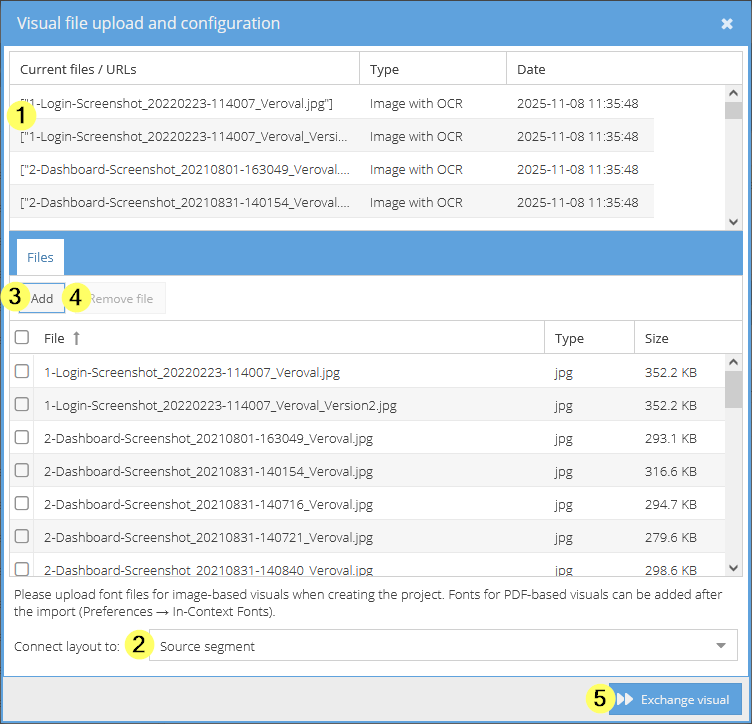
- In the upper part of the window,
you can see the Visual files currently used in the project with indication of file name, file type as well as date and time when the file was added. The list can be sorted according to the contents of the three columns.
- Use the drop-down at the bottom of the window to select
whether the Visual should be connected to the source or to the target.
- In the lower area of the window,
you can now upload the new Visual file(s) to replace the existing file(s) using drag and drop or the “Add” button.
- After uploading, the new Visual files are visible in the lower part of the window, with indication of file name, file type and size. The list can be sorted according to the contents of the three columns.
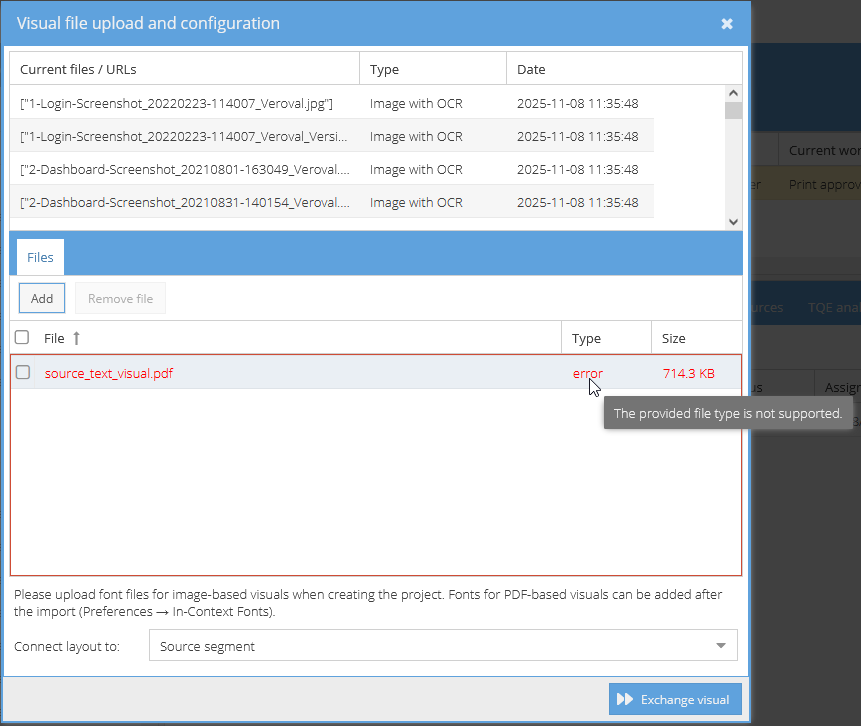
- If you have inadvertently uploaded one or more incorrect Visual files, you can delete them by ticking the corresponding line and then clicking on the “Remove file” button
.
- Confirm via the “Exchange visual” button in the bottom right
.
The view carries you back to the task list, and you can see from the status “visualexchange” and the progress bar that the exchange is running and when it is complete.
The replaced Visual file(s) are moved to the reference files and, depending on the connection type, “Visual replaced source replacement date_replacement time” or “Visual replaced target replacement date_replacement time” is added at the beginning of the file name.
| The “Exchange visual” option is only available in the task menu if the project has been set up with a Visual file. If not, the option “Add visual” appears in the same place instead. |
|---|---|
| The new Visual file must be in the same format as the original Visual file for which it is being exchanged. If a Visual file is uploaded whose format differs from that of the existing Visual file(s), its information is coloured red and an error is flagged. |
| Attention: If more than one Visual file is involved, all Visual files must be uploaded (again) – even if only one of them needs to be exchanged. The file(s) that are uploaded for the Visual exchange will replace the previously used Visual files. |
| You can also upload several Visual files together or provide them in a zip package that contains the .zip folder structure according to an import zip archive. |
| Only files of the same file type can be added when dealing with multiple Visual files. |
| PDF visual files can also be exchanged for several projects at the same time via the batch operations option in the project list. |
Error messages during Visual exchange
In the following cases, an uploaded Visual file is highlighted in red and an error is displayed:
- The file format of the new Visual file(s) does not correspond to that of the previous Visual file(s).
- The file format provided is not supported.
The type of error becomes apparent when you hover over the “Type” column on the line of the affected file with your mouse.
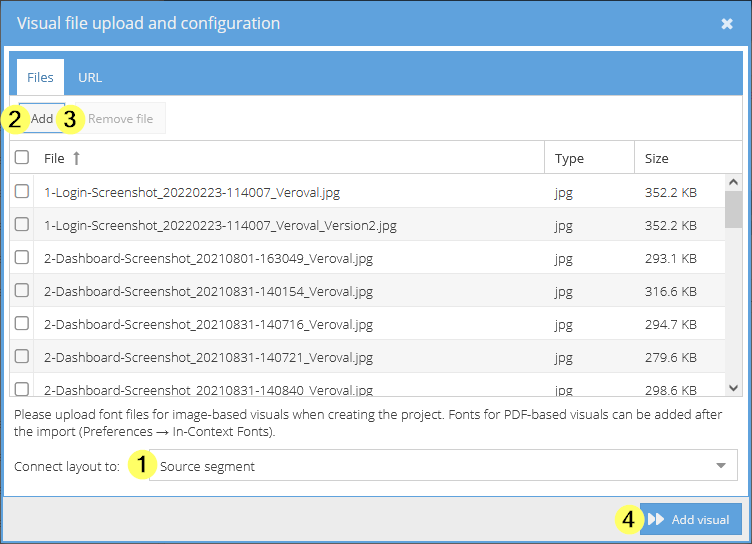
Adding a Visual file
In the event that Visual files need to be included in a running project that had been set up without any Visual files, you can still add the Visual files to the project later:
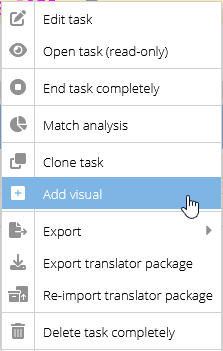
- Switch to the task list.
- Open the task menu on the line of the relevant project () and select the “Add visual” option.
- The “Visual file upload and configuration” window appears.
- Use the drop-down at the bottom of the window to select
- Now upload the new visual file(s)
- If you have inadvertently uploaded one or more incorrect exchange files, you can delete them by ticking the corresponding line and then clicking on the “Remove file” button
- Confirm via the “Exchange visual” button in the bottom right
| For this functionality, the Visual plug-in must be active in your translate5 system. |
|---|---|
| The “Add visual” option is only available in the task menu if the project was not set up using a Visual file. If there already is a Visual file, the option “Exchange Visual” will appear in the same place instead. |
| Only files of the same file type can be added when dealing with multiple Visual files. |
File formats
| File formats permitted for Visual exchange | File formats not permitted for Visual exchange | ||
|---|---|---|---|
PDF files | Video files: Due to the associated time codes of the subtitles, there could be shifts so that the alignment between video and text content is no longer guaranteed or meaningful. | ||
Pixel-based images (e.g. screenshots of apps for app translation).
| XSLT stylesheets that are linked with the imported XLIFF or XML source files. | ||
HTML files in a zip folder that contains the .zip folder structure according to an import zip archive. | Website URLs | ||
Website URLs as a “reviewHtml.txt” file in a zip folder. |
Tut uns leid, beim Prüfen ist etwas schiefgelaufen. Vielleicht hilft ein Neuladen der Seite oder ein Neustarten des Browsers. (undefined)