It is possible to connect Translate5 with Keycloak / Redhat SSO as Single Sign On provider. This Page will explain you how to do the setup. The screenshot will show Redhat SSO which is the commercial edition of Keycloak, but both should be very similar.
Prerequisites
To Simplify this tutorial we are assuming following things:
- You have a running instance of Redhat SSO 7.X.X
- You have a running instance of Translate5
- You have admin rights on both systems and are confident with them
We will be using following values in the tutorial:
| Parameter | Value used in tutorial as example |
|---|---|
| Translate5 URL | https://translate5.yourdomain.com |
| Redhat SSO URL | https://auth.yourdomain.com |
| Redhat SSO realm | CompanyRealm |
Redhat SSO Setup
Open your Redhat SSO Admin console and open your CompanyRealm.
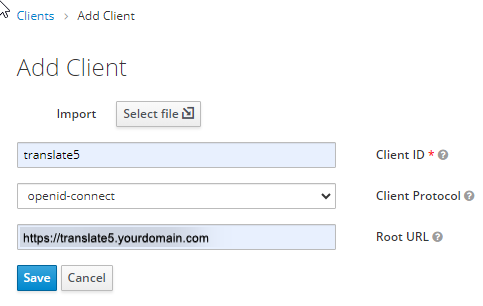
Go to the Clients list and click Create.

Fill the inputs in the following way:
| Parameter | Value | Information |
|---|---|---|
| Client ID | translate5 | This value will be your OpenID username in the Translate5 settings |
Client Protocol | openid-connect | |
| Root URL | https://translate5.yourdomain.com |
Click Save and open the Settings tab from this new client.
Change the following settings and leave the rest as is:
| Parameter | Value |
|---|---|
| Access Type | confidential |
| Implicit Flow Enabled | ON |
| Direct Access Grants Enabled | OFF |
| Valid Redirects URI | https://translate5.yourdomain.com/login |
Click Save and open the Credentials tab that should now be visible.
Make sure the settings are are follows:
| Parameter | Value | Information |
|---|---|---|
| Client Authenticator | Client id and secret | |
| Secret | Generated_XXX_Secret | This value will be your OpenID password in the Translate5 settings |
Translate5 Setup
Open Translate5 as Admin and open the Clients view. Create a new Client with the following settings:
| Parameter | Value | Information |
|---|---|---|
| Client name | Redhat SSO | Can by anything |
| Client number | X | Can by anything |
| Translate5 domain | translate5.yourdomain.com | Do not put the protocol (http/https) in here |
Save and open the OpenID Connect tab.
| Parameter | Value | Information |
|---|---|---|
| OpenID server | https://auth.yourdomain.com/auth/realms/CompanyRealm/ | |
| OpenID issuer | https://auth.yourdomain.com | |
| OpenID username | translate5 | |
| OpenID password | Generated_XXX_Secret | |
| OpenID OAuth URL | https://auth.yourdomain.com/auth/realms/CompanyRealm/ | |
| Default roles | Editor | Editor is the minimum required role to access the Translate5 instance |
| Allowed roles | Editor | Note: Currently We only know how to use the Default roles and are unable to setup the roles in Redhat SSO |
Save.
Test the setup
You should now be able to go to the main translate5 url at https://translate5.yourdomain.com/login and you should see a Button "Single Sign On" Login.
By clicking on it you should be redirected to your Redhat SSO authentication page, and once you logged in there you should be redirected to translate5 and the editor should open.